In the second part of 'How to Tan a Deer Hide', Dr Simon Lee looks at the treatment and finshing of your skins.
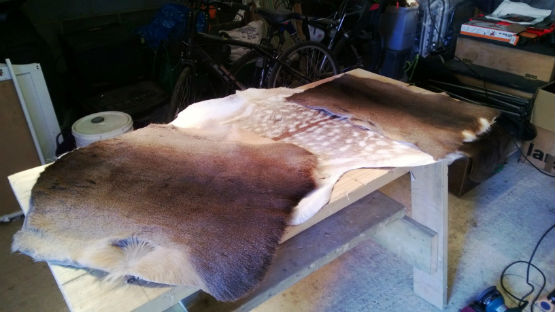
(Above: The finished article, some beautiful pelts)
Following on from the first half of this article we start with a brief look at the less attractive aspects of tanning. Chemically, the process historically required a reaction from faeces, either dog or pigeon, this was performed by an unfortunate tanner who was required to knead with bare feet.
Mercifully, times have moved on and the neat tidy bags of chemicals in the K-tan kit are far easier to handle, but warnings printed on the package recommend gloves and face mask, so take care.
 Out of the toolbox comes an empty container, washed out. I use the larger four pint opaque milk containers for this, the price is right, you can see the level, and you can give the thing a good shaking to dissolve the chemicals, the first of which is the pickle mix.
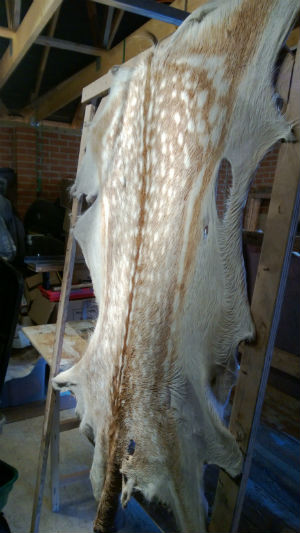
(Left: Attach the skin to a frame)
The pickle mix is a slightly off white bag of granules, this gets shaken up with the appropriate amount of hot water and once dissolved gets pasted onto the flesh side of the pelt, folded inwards and wrapped again for 24 hours, thereafter the texture of the pelt will change and feel 'sharper'. To get a good even layer I use a wide paintbrush, making sure to get right into the nooks and crannies near the edges.
After 24 hours I hang the pelt up and allow the excess to drain off, when the drips have stopped the next phase is tanning, the second bag of powder is mixed up and applied to the flesh side, this is repeated after two hours, then the pelt is folded inwards and left to absorb the solution. Times vary here depending on weather and thickness of skin. Guidelines in the instructions can help but to test the penetration a small cut can be made to check the blue/green colour has gone down to the roots.
When you are satisfied the tanning process is complete the pelt must be thoroughly rinsed in cold water and allowed to drain. By now it's probably been about four days since the process started and the pelt is starting to look and feel more like leather.
Next comes neutralising, without which the vestiges of a chromium base tanning agent will keep working on the skin, the small packet of powder is mixed with hot water and applied to the flesh side, folded in and bundled away for another 24 hours.
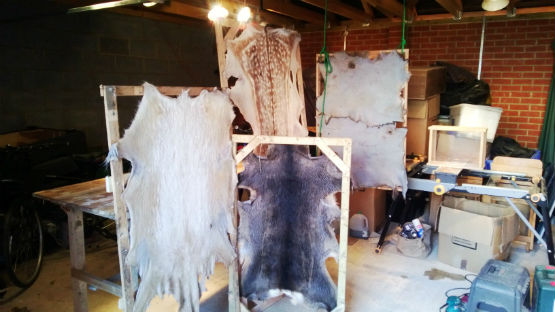
Another day of invisible chemistry passes and in the meantime you have made your drying frame, the bigger the better here, a good margin around the edges is essential, a large board will do at a pinch but won't allow air circulation as well as a frame.
The next phase is oiling, the small vial of oil is mixed with boiling water and applied with a stiff brush to the flesh side of the pelt. All the dribs and drabs of previous solutions can be kept with the lids on but must be reheated prior to use.
Drying the skin is the next step, you can either lace the edges to the frame or use a stapler, for a nice symmetrical pelt I like to pin up the tail and neck area and support (not pull) the sides apart slightly. Allow to dry out of direct sunlight to avoid getting called Hiawatha by the neighbours.
When the skin feels dry but not brittle it should be taken down for softening, the best tool is apparently a lawn edging tool but I have found a curved spade equally good, more effort here will produce a suppler pelt, should you have clothing in mind the softer the better. A good reciprocal burst of pulling with a helper will see the initial softening done. A good test is to be able to roll the pelt up without too much effort.
Next, lay the pelt out on the bench and, with a coarse disc, work the sander around the pelt into all corners, the colour will go a light grey and the texture like a rough shammy leather.
With the scalpel, trim around the edges to the shape required, I usually find the dark stripe on the back of a winter roe pelt and fold it in half to get an idea of a centre line. With the scalpel, cut from the flesh side and aim to cut through the leather only, cutting through the fur itself will make for ‘tufty’ looking edges and hair everywhere.
And there you are, your pelt is finished, I hope that you’ll be delighted with your results, remember however that all fur tends to shed hair to a degree, so be prepared for some initial domestic resistance, personally I keep mine in my office!
To read the initial instalment of 'How to Tan a Deer Hide' follow this link: how-to-tan-a-deer-hide